Saturday, June 13, 2015

DIY portable light strip

I did this portable light strip back in Dec 2013 but never had a chance to write a build instruction about it until now. This unit that I made was inspired by Saberstrip. This unit is meant to be portable, yet provide enough power and light quality for 1-2 person portrait. I've been bringing this unit to all of my wedding events for getting ready shots where space is very limited.

Here's the material list:
    Paper shipping tube (pick 1 with large enough inner diameter (ID) to fit your flash. In my case, I have a 3.25" ID that would fit Nikon SB-28)
PVC end cap with clean out plug. The ID should be slightly larger than your shipping tube. See step 10 for detail.

1/4" 20 screw/nut. Search ebay for "quick release mounting plate rapid". What you need is the screw on one side and nut on the other side.

Self adhesive in black color

Aluminum tape
Cheapest and thin shower curtain I could find in Walmart. Not too thick that it would block too much light.

And a number of  nut and screw I found in my tool box: 2 any size at length of about 0.5" and 0.25" and 1 nut with 1/4 20 thread.


The build:
1. My tube was a bit too long so I cut it down to 38". Calculate the length so that once complete, the top of the flash is the beginning of the open area. From top of the unit down 2", is the open cut at length of 29". So my 38" over length would have completely covered bottom of 9" for the flash unit.

2. Cut the window starting from top 2.5", length 29" and width 2.25"

3. The cut out from step 2 is now about 29". Cut it down to about 15.5". With the cut out piece drill small hole at about .75" from each end


4. Cover this piece with aluminum tape


5. From top of the tube, 1.5" down drill another hole at center of the window and install the 0.5" screw. Use electrical tape to run along the edge to prevent the material from peeling off.


6.  Try to install 1 end of the cut out piece so that the aluminum would face out the window. At the other end of this insert, there is another hole that was made in step 3. Drill the tube this insert as guide. At the end of the project, 1 end of the insert will be installed at top of the tube where it's close to the window. The other end of the insert will be on the opposite wall.


7. Remove the insert and start to completely cover the inner tube with aluminum tape. 
8. Install the 0.5" screw at top of the tube and the other 0.25" screw at the bottom of the insert.


9. The body is now completed.
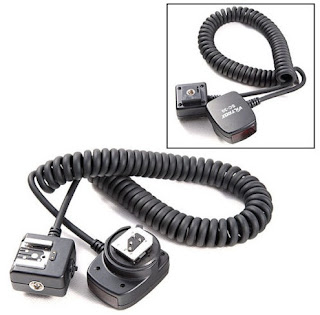
10. Next is to build the flash mount. Remove the clean out plug and drill a whole large enough to route cable from flash mount through it. I had to cut the cable short on mine, loop it through and solder it back. There are options to solder it back. I had Radiopopper Jr before. So I had 1 version where I solder it to the 3.5 jack. Now I'm using Cactus V6, I solder it back to the original extension head for use with cactus. NOTE: When I was at Home Depot, I saw 2 version of the clean out plug. 1 with a wider open from the inside as picture in step 11, the other 1 has a smaller open. It is easier to have the large open from clean out plug for ease of flash mount installation.


11.  Drill 1/4" hole at center of the clean out plug. Install the screw/nut from quick release plate. Tighten it down with a nut and locktite.


12. Use sand paper or sand belt if you have access to one, Sand the flash cube so that it would fit snugly inside the clean out plug. I had a good amount of hot glue in there before forcing it into the plug.


Top is the cut cable, left is the soldered to original extension cable (little shorter than original), right is the 3.5mm jack

13. Cut out the shower curtain, temporary hold it in place, use the black adhesive back to wrap the tube. This give it a nice finish and hold the curtain in place very well.


This is how it looks like from bottom of tube where the flash would fire up. The first half of the window has no reflector, the last half of the window has the ramp to bounce flash up and out the window.


15. My PVC endcap is slightly bigger than the tube, I had to put 1 round of foam tape and another layer of double sided tape then insert the end cap to the bottom of tube.

16. My tube came with end cap so I had it back on to the top of tube

17. The bottom of the flash tube, there are 2 options that I made. 1 is Velcro to hold Radiopopper receiver. The other is flash stand mount to hold the Cactus V6


NOTE: The flash mount is at center of the tube, make sure the flash you want to use has feet some where close to the center. If you flash has feet is off center, once insert to tube, it will be hard to mount the end cap and/or damage your flash feet.

Have fun and share your final tube. Any question, let me know.

Sunday, July 13, 2014

Swimming with the pigs on Pigs Island, Staniel Cay, Bahamas

What: Have you ever seen pigs? Now have you ever seen pigs walking on the beach? And eating lobster head for breakfast? Something I’ve never seen before and probably not many of us have. This trip to the Pig Island is a great once in a life time experience.

When: I married woman on Memorial Day weekend this year 2014. She’s everything a man like me could ever ask for. We headed to Bahamas early June where this Pig Island is close by. But anytime of the year would be just as beautiful except hurricane season which I believe in September on (do your own homework, don’t trust me on this).

Where: The Island you want to be on is Staniel Cay. From there, it’s a 5 min boat ride to Pig Island.

How:
Getting ready:
My first question when I want to get to these pigs was where and how. Like I mentioned above, it’s a 5 minute boat ride to Pig Island from Staniel Cay. But first, if you decide to stay in Paradise Island (Atlantis or Riu Palace, where we stayed), you would need a ride to Staniel Cay. You have few options to get there:

  • Boat ride: We did not look into this to begin with. I think it’s a 3-4 hour boat ride which we don’t have. As we talk to the local while on Staniel Cay, they do go by boat but air is much faster.
  • Charter air: If you have a large group, this might be a better option. They will fly on your preferred schedule. The price would work out much better. Since it was only for 2 of us, we picked option 3.
  • Scheduled air: The only scheduled air service is Flamingo Air. They make 2 round trips per day. 1 at 8:00am from Nassau to Staniel Cay and the afternoon at 3:10pm from Staniel Cay to Nassau. You can book in advance by http://www.flamingoairbah.com/ or email Flamingo Air flamingoair@coralwave.com. The website was down and still is at the time of this post. I didn’t have much success with email even with simple questions. The best way was to call them at 954-839-8688 (from US). They will email you a payment authorization form. I paid $157 for round trip per person from Nassau to Staniel Cay. Here’s the first problem with Flamingo Air. I provided 2 names but only receive 1 confirmation number. Had to keep calling back up and finally got a hold of some one. That person ended up sent me 2 confirmation numbers for my wife. I now have 3 confirmation numbers.
Regarding equipment as I am assuming you are photographer, I took with me:

  • D800
  • Nikon 16-35mm f/4
  • 2x32GB SD and 2x8GB CF as backup (have 64GB in body if possible as I ran out of space little after I left the Pig Island)
  • Underwater housing!!! It’s a must. I got mine from http://www.borrowlenses.com/ . They have AquaTech housing for my setup. Big help.
  • Another option is to get the point and shoot Panasonic TS4 (I had 1 for underwater but forgot for this trip L). Or just waterproof plastic case for your phone or GoPro if you just want to enjoy the time there instead of use all 40GB of memory card like I did.
  • SETUP for AquaTech: It’s a bit tricky, I had the camera setup as follow:
    • Auto ISO
    • Aperture Priority
    • Auto focus point
    • Continuous High at 4-5 frame per second (this will eat up memories but you want to do this as some pigs can get aggressive and keep coming at you. So you want to take as much and as fast as you can. Plus the Auto focus means hit and miss. You can have it locked to manual focus if you want to)
    • If you want, set shutter button to start and stop movie. I didn’t try but I believe that would mean the autofocus with shutter button is disable and can only focus using AF-ON button.
    • I experienced cases where ISO is set to 1600+ in day light and Speed would be in the high range 1/4000 +/- . So if you can set ISO to be lower priority on your camera, it would be better.
The Day:

We stayed in Riu (all inclusive). So we packed ourselves with hotdogs, fruits, bread. I have seen the youtube videos and they will only follow the food.
We left Riu at 6am. Taxi ride to airport is about 30-35 min for $35 USD. Very quiet early in the morning but Taxi are always there in front of the hotel. At the counter, we were able to confirm that we had 3 confirmation numbers. As long as on our return flight, use the same confirmation numbers, call the same number when we get back to the US to cancel the unused confirmation. Long story short. I left them a message. Unable to talk to anyone but I have been keeping close monitor on my Credit Card to make sure there are only 2 transactions. Anyway, the airport was busy for morning flights. It took us about 30 min from arrival to the airport to the gate for such a small airport. We waited until about 7:45 am and we boarded. It's a completely different experience. Boarding took less than 10 min and we were off the ground.
Boarding Flamingo Air to Staniel Cay

The flight took about 45 min. We got there and asked the local to get to the Pig island. We were taken to the location as in the image below. The store owner gave us option to either ride the boat ourselves or have a guided tour. Since we didn't know how to ride and had no idea how to get around. We asked to have a guided tour which put us back $175.
Boat charter location
We took off on this boat with Oliver for the half day tour.
Charter boat

Oliver took us to multiple location beside the Pig Island. See the 2 images below.

Staniel Cay Tour

Staniel Cay tour
And here are the pigs I was able to capture on this Pig Island.

ALL PHOTOS ARE COPYRIGHT. PLEASE DO NOT DOWNLOAD BEFORE ASKING FOR PERMISSION.


Monday, March 24, 2014

Nikon D800 Battery grip MB-D12: Real vs. counterfeit vs. third party

I'm a part-time event photographer. The grip became my best friend after the body itself ever since I've used it on D700. It was used when I bought the D700 and it was a great deal at $150. So when the D800 came out with MB-D12 for $600+, it was an easy decision that I'd wait for third party grip. I'll cover 2 items in this write up:
1. What made me think third party grip not worth the investment.
2. The different between grips (real/third party/counterfeit)


I bought Meike for $60s from ebay. It was good for about a year and started to give me problems.
1. The grip itself started to get loose from the camera even after the screw was tighten all the way in.
2. Because of the loose grip, its movement started to scratch the camera's bottom edge in certain places.
3. The plastic dial that's used to turn the screw to lock is no longer in sync with the screw. The dial can be turned but the screw will not move at all. This make it hard to put it on or even worse cannot take it off.
Meike MB-D12 grip for Nikon D800. It has gap at the dial which leave room for it to come down and not locking to the actual screw to perform screw or unscrew action.
Genuine Nikon MB-D12 for Nikon D800 with no gap
Meike MB-D12 grip for Nikon D800. After open up Meike grip, I found out one of the four screw broke off. Of course the plastic could not handle the weight of the camera and lens. This lead too the problems I mentioned above.


 After this I decided to buy genuine Nikon MB-D12. Little did I know, there are counterfeit Nikon MB-D12 on ebay. I said counterfeit and not third party because it has all marking, labeling, and boxes, manual that say Nikon all over it. The only different is it's made of plastic. It's hard to tell. You can see varieties of these counterfeit on ebay range from $80 - $200. So I decided to try out the $80 version. and $200 version. $80 counterfeit version would say this is not genuine and ship from China. $200 version may say "used". Used listing is the only way to void warranty if you have problem. We know warranty does not transfer. And used Nikon has much better value than counterfeit Nikon. Plus used seller doesn't have to be an authorized seller. So if you buy used, make sure ebay seller provide receipt. Better yet don't even get used if you want to buy genuine. Get it new from authorized dealer. I was lucky to be able to return the $200 counterfeit version because it's 99% similar to the $80 version from China.

I tried my best to document the different between the $200 "used" (aka counterfeit) Nikon grip vs. Mieke grip in the series of images below. Similar angle of the grip with Nikon counterfeit on top and Meike bottom.


 The following are battery trays of the counterfeit Nikon and Meike. They are no exchangeable. The Left is counterfeit and the right is Meike. Notice how the contact point are opposite. And the AA tray contact points are different too.


Over all the counterfeit grip feel very solid, the texture is very close to the genuine. The battery tray is not exchangeable between any version (Meike, counterfeit or genuine).

And it can be hard to tell the different between counterfeit and genuine grip. The box material and lay out is identical. These are the only differences I can see:
1. Chinese characters on adhesive label
2. Text is not clear and sharp on box as well as manual
3. Counterfeit has a soft rubber compare to genuine
4. Battery tray pouch has the word Nikon emboss not as clean as genuine.


Counterfeit box has this Chinese label on it


Counterfeit box has this Chinese label on it


Counterfeit has a soft grip
Genuine has harder plastic grip


Update: I forgot to mention that I decided to get genuine grip from B&H. The counterfeit seem to works fine for awhile and it would start locking up the camera after about 200 shot. I'm not sure why but after I put in the genuine it never happens again.