Monday, July 13, 2009

How to create a Wee Planet

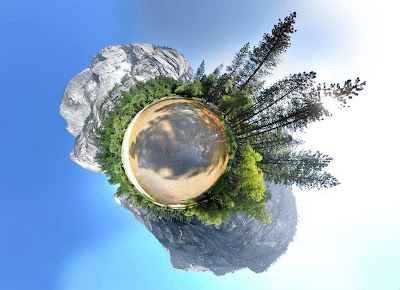
What: Wee planet aka Stereographic projection, pano 360/180 projects a sphere onto a plane. I will not go much into detail of this projection but rather how to create such image.


When: This particular piece was taken at around 4pm July 8th 2009. The mid summer weather in Yosemite gave a clear blue sky.

Where: This was taken in the middle of Mirror Lake, Yosemite National Park, CA


How:
Gear: I bought with me Nikon D90, Tokina 11-16mm, light weight tripod. Tokina 11-16mm because it's wider thus you would need to take less picture to create wee planet. BTW, you would not need to have DSLR or something fancy to do this. I've seen people with point n shoot camera get a better planet than I do. After all this only the second planet I'm making.

Setting: Depend on what camera you are using and change the resolution. But at the end, the software only process picture at 1600-1063. So I set Small/Basic for my camera. I had this all done using Program mode. Many people suggest use Manual so you have consistent light for your series. But I think that just make some are over and some under exposure.

Shooting: When doing this, rotate you and camera around lens, not lens and camera around you! Best way is to lean lens on tripod grip pointing upward. Shoot continuously 1 after another with about 30-50% overlap. More is always better as you can remove the access later. Go from 3-5 degree (straight down is 0 degree) up to about 130 or until you cover all the objects. Go left to cover 30-50% and go down to ground again. Keep doing this until you cover all the surrounding. I normally do 5 per column and go for 8-9 columns.

Process:
1. Resize: If the photos are not 1600x1063 or smaller, save yourself sometime by doing batch edit because Hugin doesn't like big pics and resize it very very very slow. I used Photoscape to resize in batch. This is a free software and the most easy to use I've ever seen.
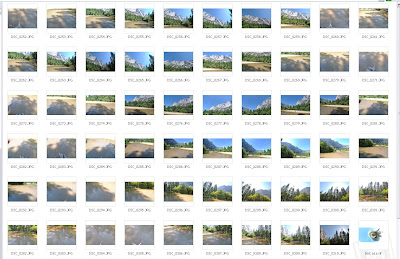

2. Load: Click load image and load all the photo you just resized in step 1. No rocket science yet! Depend on which lens you use to change the lens configuration. I used Tokina 11-16mm and didn't have to change anything.

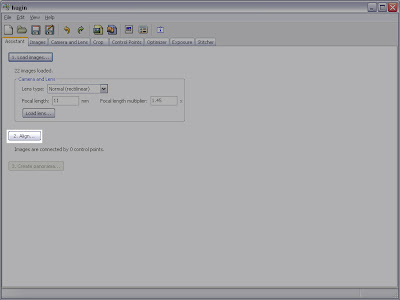
3.Align: Click Align and wait, wait and wait... What Hugin's doing now is trying to find control points of the overlap between the 2 images. I think it does a pretty good job. It'll eventually miss some such as the 2 ground images where it's all same color (carpet, cement floor).


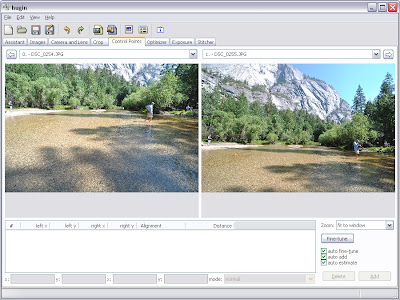
4. Manually find control points: Here come the rocket science part... j/k. Go to Control Points tab and select the 2 photos that having problem with control points. Say left side is 0 and right is 1. Manually click on left or right side and find similar location on the other side the click ADD. Find 5-10 control points per pair of photo. Go back to first tab and click align again. If still does not work after many time repeating this step, just remove whichever photo that is giving you trouble (hopefully you had more than enough to cover all the area.)

5. Equiretangular: Once successfully align, preview window will pop up(if not Ctrl+P should do it), you will get a Equirectangular like below.


6. Stereographic: At bottom left corner, select change Equirectangular to Stereographic. At this point you'd get some weird image. Don't panic. Adjust bar at the bottom of the image. Pull to about 10 notch from the right and you'd see your planet. Left click mouse on the ground at about where the camera was or until the planet's lay out the way you want it to be. Right click to adjust turn planet. At this point, you'd see something like the below picture. Excited? but not as clean as you want it to be.

7. Clean up: Uncheck as many images as you can under Display images as long as it does not make major change or shift your master piece. Go back to Hugin window, under images tab, delete corresponding images. Number in Displayed image is the number under column #. Close preview window once completed.


8. Stich: Go to tab Sticher and make selection as showed below and click stich now. Wait, wait and wait...
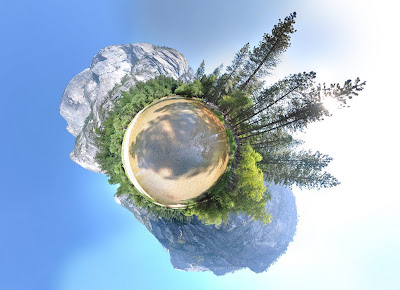
9. Touch up: Open TIF file Hugin just generated (see below) with PS and edit: color saturation, erase your feet showed at the center if it's there when you do 0 degree ground pic. And tada ... you have yourself a wee planet!!!

Saturday, July 4, 2009

Pier 7 San Francisco

UPDATE: I just got point out that All piers North of Bay bridge are Odd except #14. South of the bridge are where all the even pier at :)

What
: This is the picture of San Francisco city


When: I got to this location around 8:30pm on Jun 15, 2009 (~30 min before sunset). I parked on The Embarcadero across Pier 6 (many people call this Pier 7 but from the map it's Pier 6). Since it was late on a week day, I could easily get a free parking spot at the meter. This particular picture was taken at 8:50pm. I got there just right on time to capture the sun set light. Lighting is very critical in ALL picture. In case like this where you have no control over the nature light, you can waste the whole day and could not get a good shot.

Where: To get this shot, walk all the way to the end of the pier. Don't forget to stop along the way for some beautiful sunset shot at other piers, look back at coit tower, and all the building start to light up. Walking time about 10 min to get to the end. But you could end up spending 1 hr plus at this location (FYI so if you have to pay for the meter), I did. Photography is a time killer hobby. I like sunset shots but this whole process change lighting every second so it's hard to walk away and not capture it. You'd miss your best shot the second you walk away!


How: I used Nikon D90, Tokina 11-16mm for this one. It's important to get the right angle because you can't ever edit the angle once you capture it (possible but don't go there). So look, scan the entire area in view finder for any error, not just your subject, all the surrounding counts.

Here's the setting
Focal Length: 11mm
F-Number: f/4
Exposure 1/3 sec ( I didnot have my tripod at the moment so leaning on the light pole help)
ISO: 400
Flash: not fired
I also had it in raw (.NEF file). And this is the result:

Of course it's not perfect, most of the nice, eye catching pictures you see were edited one way or another. I used Photoshop CS3 and Photomatix Pro3.1 to get the result at the top of this post. I'll go into detail on how to make it looks juicy later on.

Friday, July 3, 2009

My Toys

So this is the current setting I have:
I had SB-600 back when I still had the D40x. Couldn't do much with this flash since D40x won't sync with it. But it's a must. BTW, I still don't get this... I bought it in 08 for $177 new on Amazon and now it's priced at $219 ?!?!


I started off with a Nikon 50mm f/1.8D for low light condition and it's a cheapest nice lens from Nikon. I took it home used from ebay at $80ish when it's $135 new.


Then I got this "grey" market Nikon 70-300mm VR. It's the beast! The crazy thing is I got it off craigslist for $340 when the US version new priced around $540.

So I was happy with my D90 kit lens Nikon 18-105mm VR and these two but I soon found out I still "need" something ...

That's something was a Macro lens. And again craigslist saved me big time. Got Sigma 105mm DG for $300.

And a Wide lens. I wanted a Sigma 10-20mm but after talking to cousin, he brought up the Tokina 11-16mm. After readings about this lens, I was on the hunt for a month for this hard-to-find lens. Drove 2 hrs to meet and bought this for $500 also from craigslist.


Now, there's nothing from with craigslist, used, grey market items. You just need to be careful and you'd save yourself stacks of cash (with a googly eyes singing "Tell me who's watching, I always feel that somebody's watchin' me" LOL)

Also I had some other must-have accessories such as flash diffusers:

And battery grip


And other nice-to-have accessories such as wireless remote trigger, wireless flash trigger, extension tube, 58-52mm reverse lens adapter, additional getto flash


And other accessories not in pictures such as Lowepro slingshot 200AW, lens case 2, getto tripod.

Last but not least, THE Nikon D90... tada...


If you are about to get any of these toys, feel free to ask me for opinion. I think this is a good set up for the moment. Of course a Nikon 17-55mm f/2.8 and 70-200mm f/2.8 would be nice members to the collection but... why? Photography is a great hobby but not a great job if you take a closer look. If you want to make big buck, get a real degree and get real job. And if you want to make money out of your gears, you should be looking at how much you spend on your gear and how much it makes for you. The expensive gears does not promise you to bring the most when it comes to profit.

I don't use my photo gear to make a living. I do wedding/graduation if asked and if people trust me enough to put their once in a life time even to my eyes and gears.

Please enjoy the upcoming post and hope you'd come back for more. This blog would focus on places I've been, where I stand and what I took(I notice alot of posts, pics online where they tell you where's the place in that picture but doesn't tell you how to get there and where to stand which could be miles away), and the settings. Thought the settings don't matter much as the same situation, light wouldn't come back.

About me

So today I finally get time to start this page. I meant to do this for some time now but time seem to get sucked out of my life lately. Anyway, this pate should be all about photography and not me whining about my "perfect" life.

I've been loving photography seen I was as little as 7th grade. Of course it was all film back then. On one-week family summer trip that year, I wasted 4 rolls of 36exp film. It was all about nature. But we all know as we first play with camera, it's all random shot which at the end they all look the same and has no structure whatsoever. I have not play with camera until I had my first digital camera in 2001 when a 1.3 mega pixels (MP) was still $150. It was Olympus D-150. Its performance? Somewhat less than my current 3.0MP camera phone now. But I was happy and had good time since it was one of those first digital camera back then.
Until 1/20/2004. My grandpa gave me a Canon G5. I know the exact date because I still have that receipt. Why? That's just what I do, everything go back to the box and tuck away. I never thanks him enough for getting my feet wet again in this hobby. It was around $450 at the time which I then spend another $500ish on accessories. $200 alone on a 1GB compact flash card in 2004 ?!?! I know... And I still have this camera which I'm not planning to get rid anytime soon... It's a piece of mind.


I had this camera until 12/13/2007 when I graduated from college, get a real job and got myself a real DSLR Nikon D40x. The fun started then.

In Japanese Garden, Senter Rd, San Jose, California

West Cliff Dr., Santa Cruz, California

I had way too much fun with this guy. I spent nights playing with it in my room just to take pictures of nothing and learn nothing but just to get used to it. I also used this to do outdoor album for my brother wedding. I out-grown it so fast. I gave it up to fund for a D90 in 12/01/2008. Check out my toys post for my current setting.