Here's the material list:
 |
| Paper shipping tube (pick 1 with large enough inner diameter (ID) to fit your flash. In my case, I have a 3.25" ID that would fit Nikon SB-28) |
 |
| PVC end cap with clean out plug. The ID should be slightly larger than your shipping tube. See step 10 for detail. |
 |
| 1/4" 20 screw/nut. Search ebay for "quick release mounting plate rapid". What you need is the screw on one side and nut on the other side. |
 |
| Self adhesive in black color |
 |
| Aluminum tape |
 |
| Cheapest and thin shower curtain I could find in Walmart. Not too thick that it would block too much light. |
And a number of nut and screw I found in my tool box: 2 any size at length of about 0.5" and 0.25" and 1 nut with 1/4 20 thread.
The build:
1. My tube was a bit too long so I cut it down to 38". Calculate the length so that once complete, the top of the flash is the beginning of the open area. From top of the unit down 2", is the open cut at length of 29". So my 38" over length would have completely covered bottom of 9" for the flash unit.
2. Cut the window starting from top 2.5", length 29" and width 2.25"
3. The cut out from step 2 is now about 29". Cut it down to about 15.5". With the cut out piece drill small hole at about .75" from each end
4. Cover this piece with aluminum tape
5. From top of the tube, 1.5" down drill another hole at center of the window and install the 0.5" screw. Use electrical tape to run along the edge to prevent the material from peeling off.
6. Try to install 1 end of the cut out piece so that the aluminum would face out the window. At the other end of this insert, there is another hole that was made in step 3. Drill the tube this insert as guide. At the end of the project, 1 end of the insert will be installed at top of the tube where it's close to the window. The other end of the insert will be on the opposite wall.
7. Remove the insert and start to completely cover the inner tube with aluminum tape.
8. Install the 0.5" screw at top of the tube and the other 0.25" screw at the bottom of the insert.
9. The body is now completed.
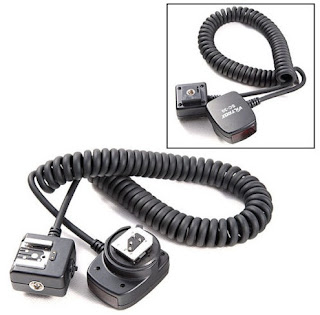
10. Next is to build the flash mount. Remove the clean out plug and drill a whole large enough to route cable from flash mount through it. I had to cut the cable short on mine, loop it through and solder it back. There are options to solder it back. I had Radiopopper Jr before. So I had 1 version where I solder it to the 3.5 jack. Now I'm using Cactus V6, I solder it back to the original extension head for use with cactus. NOTE: When I was at Home Depot, I saw 2 version of the clean out plug. 1 with a wider open from the inside as picture in step 11, the other 1 has a smaller open. It is easier to have the large open from clean out plug for ease of flash mount installation.
11. Drill 1/4" hole at center of the clean out plug. Install the screw/nut from quick release plate. Tighten it down with a nut and locktite.
12. Use sand paper or sand belt if you have access to one, Sand the flash cube so that it would fit snugly inside the clean out plug. I had a good amount of hot glue in there before forcing it into the plug.
 |
| Top is the cut cable, left is the soldered to original extension cable (little shorter than original), right is the 3.5mm jack |
13. Cut out the shower curtain, temporary hold it in place, use the black adhesive back to wrap the tube. This give it a nice finish and hold the curtain in place very well.
15. My PVC endcap is slightly bigger than the tube, I had to put 1 round of foam tape and another layer of double sided tape then insert the end cap to the bottom of tube.
16. My tube came with end cap so I had it back on to the top of tube
17. The bottom of the flash tube, there are 2 options that I made. 1 is Velcro to hold Radiopopper receiver. The other is flash stand mount to hold the Cactus V6
NOTE: The flash mount is at center of the tube, make sure the flash you want to use has feet some where close to the center. If you flash has feet is off center, once insert to tube, it will be hard to mount the end cap and/or damage your flash feet.
Have fun and share your final tube. Any question, let me know.


